I am one of the co-founders of Laboratório Hacker de Campinas (LHC), one of the first hackerspaces in Brazil and during more than a decade we always struggled how to publish and publicize our events.
We started publishing them in our Wiki and crafting some custom scripts to convert certain special pages (following a very specific pattern) into entries of a ICS calendar (people usually didn’t follow the pattern, so many events were missing).
For other years, we use meetup.com. It worked well and the net effect was good to make more people to know about the hackerspace. However they started to charge a not reasonable amount of money that we couldn’t afford to keep our community there.
I was always looking for some kind of open source and (possibly) self-hosted solution. Then I found Gancio, described as “A shared agenda for local communities.”. Created in Italy by people from political hacking movements, it looked exactly the solution we are looking for. It is simple to use, (relatively) easy to maintain, privacy focused and federated.
To deploy it, I decided to use fly.io, a Platform-as-a-Service (PaaS) company that with one Dockerfile and a few configuration files I was able to quickly deploy Gancio there. They require a credit card to create an account, but if your application doesn’t use much CPU|memory|network|storage (which is our case with our calendar), it is very likely that you will never reach the minimum threshold to start paying. So it will be basically free to host it.
UPDATE (2025-03-04): fly.io did some changes in how they charge their users since this post was written (and to be honest, I still didn’t completely understand how it works), so perhaps following the steps that I shared here will not be totally free as before. But due to the ease of configuration and maintenance, I still believe it is a low-cost alternative to be considered.
Disclaimer I am not being sponsored by fly.io. It is just a service that worked well for my needs.
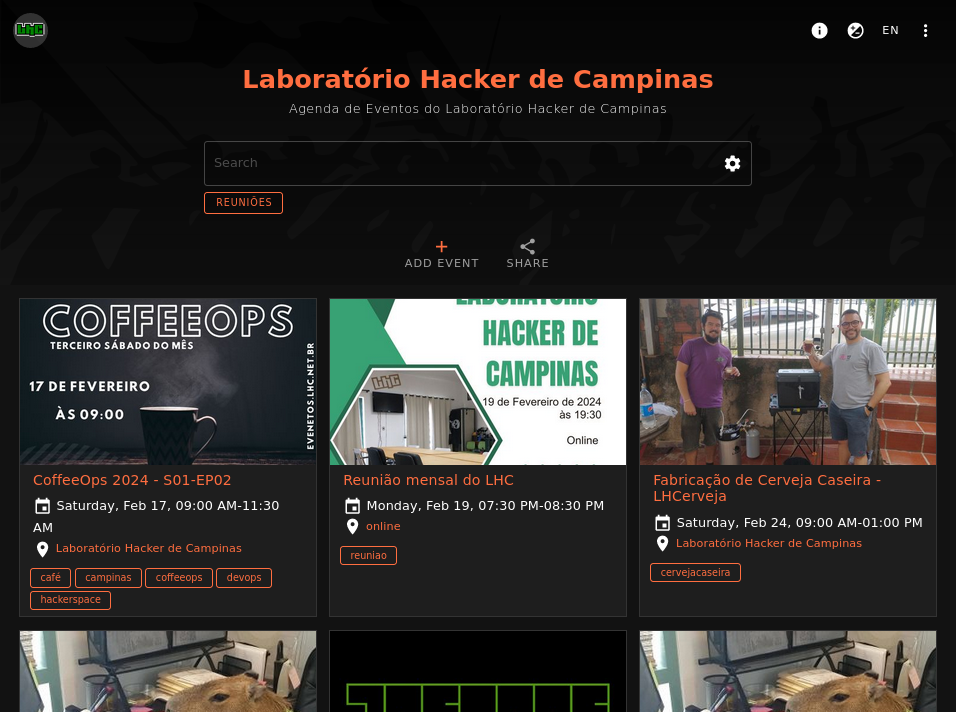 My hackerspace calendar running on fly.io
Pre-requisites
To follow the next steps, you should have a basic knowledge with Linux and being comfortable to use command-line. Also I am assuming that you have a custom domain and know how to configure a DNS hosting to point it to a server.
Preparing the environment
We need three files that contains everything to deploy Gancio:
Dockerfileto build the application)config.jsonto configure the applicationfly.tomlto deploy the application
Start create a directory where you will place all these files. The first file you need is a Dockerfile. I copied it from the project documentation directory and did a few changes to give more control to the configuration file.
FROM node:18-slim AS nodejs-base
RUN apt-get -q update && \
    env DEBIAN_FRONTEND=noninteractive apt-get -y install git && \
    apt-get clean && rm -fr /var/lib/apt/lists/*

FROM nodejs-base AS build
RUN yarnpkg global add --network-timeout 1000000000 --latest --production --silent https://gancio.org/latest.tgz && \
    apt-get clean && rm -fr /var/lib/apt/lists/* && \
    yarnpkg cache clean

FROM nodejs-base
COPY --from=build /usr/local/share/.config/yarn/ /usr/local/share/.config/yarn/
COPY config.json /config.json
RUN ln -s ../share/.config/yarn/global/node_modules/.bin/gancio /usr/local/bin/gancio

ENTRYPOINT ["/usr/local/bin/gancio"]
Next, create a config.json file. The following is similar to the one that I am using, but you can check other configuration options information in Gancio’s docs.
Given that I am not expecting that it will be a server with a high number of connections per second, I choose to keep every data stored in a SQLite file. This also make it easier for me to perform backups.
{
  "baseurl": "https://your.domain.com",
  "hostname": "your.domain.com",
  "server": {
    "host": "0.0.0.0",
    "port": 13120
  },
  "log_level": "debug",
  "log_path": "/data/logs",
  "db": {
    "dialect": "sqlite",
    "storage": "/data/gancio.sqlite",
    "logging": false,
    "dialectOptions": {
      "autoJsonMap": true
    },
    "retry": {
      "match": [
        null,
        null,
        null,
        {},
        {}
      ],
      "max": 15
    }
  },
  "user_locale": "/data/user_locale",
  "upload_path": "/data/uploads",
  "proxy": {
    "protocol": "",
    "hostname": "",
    "host": "",
    "port": "",
    "auth": {
      "username": "",
      "password": ""
    },
    "headers": {}
  }
}
Finally we need to configure the application to deploy it to fly.io using a fly.toml file.
app = 'gancio-my-events'
primary_region = 'gru'

[build]

[[mounts]]
  source = 'gancio_data'
  destination = '/data'

[http_service]
  internal_port = 13120
  force_https = true
  auto_stop_machines = true
  auto_start_machines = true
  min_machines_running = 0
  processes = ['app']

[[vm]]
  cpu_kind = 'shared'
  cpus = 1
  memory_mb = 1024
This is a minimal configuration that will allow you to deploy the application. But you can check fly.io docs to understand all available options.
Important to know is that we are using Fly Volumes for persistent storage. In this volume we will have the configuration files, database and uploaded data (images) stored.
Launching the application
We are ready to launch our application. I am considering that you already have a fly.io account created and installed flyctl command-line utility that will be used in the next steps.
After sign-in to your account, you can launch your application using:
|
|
You will be asked a few questions. Answer them and wait. This may take a few minutes to finish. If no errors happen, you will see a message with an internal URL provided by fly.io:
Visit your newly deployed app at https://xxxxxxxxx.fly.dev/
Now you already have Gancio up and running! It is time to configure your domain and create your first admin user.
Domain configuration
To get the IPs your application server is using, use the following command:
|
|
You will get a result like the following:
configure DNS to point to these IPs with your domain

v6      xxxx:xxxx:x::xx:xxxx  public (dedicated)  global  51s ago
v4      xx.xxx.xxx.xxx        public (shared)             Jan 1 0001 00:00
Configure a A record (v4) and a AAAA record (v6) in your DNS hosting with your domain. After you change that, it may take minutes (or hours) to be able to access it.
Now it is time to configure the SSL certificates (don’t forget to replace the command with your real domain):
|
|
And we are done! Your domain is configured and you can securely access your application.
Admin user
Now we need an admin user to manage our instance. Gancio provides a CLI that allows us to manage our calendar, approve events, etc.
Open our application container console:
|
|
s
The CLI binary is located at /usr/local/bin/gancio. Inside the container, create a new user using:
|
|
Now you can login using [email protected] as username and yourpassword as password (change the values with the ones you want to use).
Now you are ready to use Gancio!
Maintenance
After deploying the application, follow their mastodon account so you can be notified about new versions of Gancio.
To deploy a new version, you just need to use the following command:
|
|
This command will rebuild your container and publish the latest version of Gancio.
Before doing that, it is highly recommended to do a backup of the current state of the application. As we are keeping all the relevant files in a persistent volume from fly.io you can simply copy the files from there to your local computer.
Unfortunately, there is not a simple command to copy an entire volume from a fly.io volume. The solution I am using now, is to connect into the container, create a tar file of the /data/ directory, and use SFTP to copy it locally.
If I find a better solution to perform backups, I will update this post. If you find anything that doesn’t work anymore, please let me know and I will fix the post.
If you want to start a discussion about this topic, you can send me an e-mail: [email protected] ✉️
Comments
Comment by replying to this post on Mastodon.
Loading comments...
Continue discussion on Fediverse »